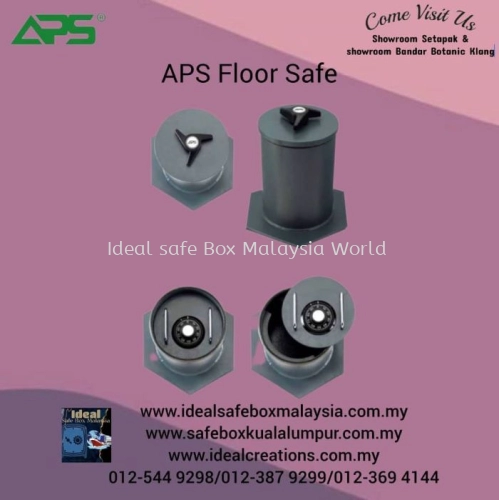
Features
- Welded steel body with 6mm door plate secured to the body by means 3 nos of 19mm diameter solid bolts with chrome finish.
- Further protection is accorded to the rear of the door by means of concealed hinges which prevents cutting of the hinges to remove the door
- Finished in high quality durable paint with textured surface to provide for long lasting resistance against corrosion and other effects of the elements.
- Assisted door opening by means of a heavy duty gas spring enabling effortless access when opening the safe. It also functions as safety feature to prevent accidental closing of the door when it use.
- Comes standard with3 adjusting screws at the base for levelling purposes during installation
- Large storage capacity
- Able to accommodate box files
- Steel cover plate provided will ensure the safe sits flushed to the floor when it not use. This will assist in concealment of the safe using items such as carpet or furniture.
Installation Guide
1. Installation should be carried out by a credible civil contractor to
ensure that the safe will perform optimally once installed.
2. After determining the desired location, the floor needs to be hacked to
the floor opening dimensions provided in the table. The selection of
the location should take into consideration accessibility to the safe
during use.
3. Once the specified floor opening has been done, the safe needs to be
placed into the cavity and levelled using the leveling screws provided
at the base of the safe. Even though the safe is securely welded, we
recommend the installer to seal all outer edges of the safe with silicon
before placing it into the cavity to prevent any water seepage.
4. The final finished floor level (tile, timber panelling etc.) has to be
taken into consideration when setting the safe into the floor as shown
in the diagram.
5. After the safe has been set at the desired position and height, the
surrounding gap needs to be filled with grouting to the concrete floor
level. The grouting should be well compacted to prevent any settling
of the safe after curing.
6. The flange at the base of the safe will ensure that the safe is well
anchored into the floor and any attempt to dislodge it by potential
burglar will be unsuccessful.
7. Allow for the concrete grouting to be fully cured before operating the
safe to prevent any misalignment.
www.idealsafeboxmalaysia.com.my
www.safeboxmovermalaysia.com.my
Visit our showroom now
IDEAL SAFE BOX MALAYSIA WORLD IDEAL CREATIONS EMPIRE
Showroom Location:
(1) Cawangan Selangor Bandar Botanic Klang
-Address: No 3, 1st Floor Jalan Remia 4, KS/6 Bandar Botanic Klang
-Landmark: Behind Dominos Botanic BMW and Mini Cooper showroom Bukit Tinggi ,nearby GM Klang and Aeon Bukit Tinggi
-Phone (Sales Department): 03-3318 6548/ 012-387 9299
-Phone (General Line / Enquiry): 012-369 4144/ 010-4646 785
-waze : ideal safe Box Malaysia World bandar Botanic Klang / ideal safe Box Malaysia Klang
(2) Cawangan Kuala Lumpur Setapak
-Address: E-1-1 Pusat Komersial Starparc Point, Taman Ibu Kota Setapak Off Jalan Genting Klang 53330 KL
-Landmark: Opposite Setapak Sentral Behind Public Bank Taman Danau Kota & Cendol Durian Runtuh Nerby JPJ Wangsa Maju Behind Alliance Bank , Carsome
-Phone (Sales Department): 012-544 9298 / 03-4141 7521
-Phone (General Line / Enquiry): 012-369 4144/ 010 4646 785
-waze : ideal safe Box Malaysia World Kuala lumpur Setapak / ideal safe Box Malaysia World Kuala Lumpur
Inquiry - Ideal Floor Safe


